CocosSharp
Make a CocosSharp Game for the Amazon Fire TV Stick
I just got a new FireTV stick, which I purchased for the $19 Amazon Prime offer. Amazon has done some fantastic work in creating this device. Even at the $39 price it is a great buy imho 🙂
The first thing I wanted to try out was getting CocosSharp running on it. It turns out this was very easy thanks to the work that has gone into MonoGame plus CocosSharp, along with the Amazon Fire TV SDK Xamarin component that we released when the Fire TV came out.
The first thing I did to get up and running was deploy a hello world Xamarin.Android app. This was trivial following the instructions on the Xamarin component page. The button click event automatically mapped to the remote so all looked good. Amazon mapped the remote to key events, so you can do normal Android key processing in an activity to get input from the remote control. This makes it super easy.
More info on the working with the remote is available in the Amazon docs.
Moving over to CocosSharp, I decided to attempt running a simple game I had made earlier in the week for a Xamarin University lecture. Without any changes, the game deployed and ran just fine! However, it was written to handle touch, so I needed to add code to handle input from the remote.
First I tried adding a CCEventListenerKeyboard to handle it from shared code under CocosSharp, but as it turns out this didn’t work. Next attempt, I tried adding key handling in the AndroidGameActivity, which I knew worked from the earlier HelloWorld app I had tried. Interestingly, in a plain Activity it worked OK, but when using AndroidGameActivity, it didn’t. It seems there’s some special input handling under MonoGame for the Fire TV. I’m not sure if that’s related or not to what I ran into here. I’ll blog about that in the future if I learn more.
Moving right along, the next thing I tried was going straight at MonoGame input via the Keyboard class. Eureka, this worked fine.
All I needed to do was call Keyboard.GetState, followed by IsKeyDown to determine which key is being pressed. For this game, I move the ship up and down vertically, so all I needed to inspect were the up and down keys:
var state = Keyboard.GetState ();

var up = state.IsKeyDown (Keys.Up);

var down = state.IsKeyDown (Keys.Down);
Then I simply used actions to move the ship up and down appropriately. I could have done it with manual positioning in the game loop, but I like how easy it is to use actions. Plus, this makes adding timing functions a snap since they are available as actions as well. In this case I used CCEaseSineInOut.
Aside, if you want to learn more about timing functions and animation check out Jérémie Laval’s talk from Evolve 2014.
With this code to handle the remote control input in place I deployed the app via Xamarin Studio and voilà, I could control the ship via the remote.
The next thing I noticed however was the custom particle systems I add for explosion effects seemed to cause performance to degrade. It wasn’t too bad, but I could notice it.
It turns out I was not being efficient with how I handled these particle systems. I was recreating a new system for each explosion (as the code below does), which required parsing the plist each time, among other things:
var explosion = new CCParticleSystemQuad ("implode.plist");

explosion.Position = pt;

AddChild (explosion);
To resolve this, I pre-created the system once and reused it as shown below:
void InitExplosionParticles ()

{

  explosion = new CCParticleSystemQuad ("implode.plist");

  explosion.AutoRemoveOnFinish = false;

  explosion.StopSystem ();

  explosion.Visible = false;

  AddChild (explosion);
}
Then every time I created an explosion effect I set it as visible, moved it to the new location, and reset the system:
explosion.Visible = true;
explosion.Position = pt;
explosion.ResetSystem ();
With that change in place, the game ran smoothly.
Here’s a video of the game running on my Fire TV stick:
The code for the game is available in my GitHub repo.
There’s more to the Fire TV stick. The sdk supports, among other things, game controllers, which I’m going to pick up over the holiday and try out next, if I don’t get tackled by some angry shoppers. Hmm, angry shoppers, maybe there’s a game concept in that 😉
CocosSharp Custom Particle Systems on Windows Phone
Last week I showed how to use Particle Designer in conjunction with a CocosSharp game targeting iOS and Android. One question that came up was if this would work in Windows Phone as well. CocosSharp works great on Windows Phone (and many other platforms since it’s built on MonoGame). So for the Windows aficionados out there, you can do all your development in Visual Studio and target Windows desktop, Windows Store, Windows Phone, (and of course iOS and Android via Xamarin 🙂
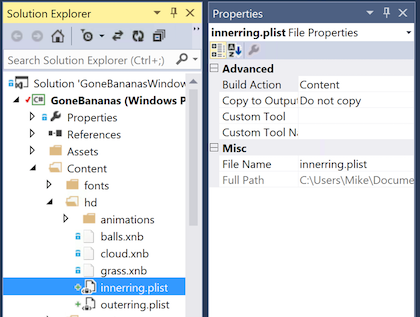
But the I wasn’t certain about the custom particle systems so I gave it a try. It turns out it works fine. All you need to do is include the plist files in the Content folder and set the Build Action to Content:
Here’s what the game looks like running on Windows Phone (a Lumia 520 running WP 8.1 in this case):
